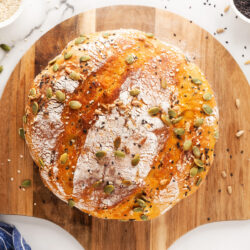
This super pillowy Pumpkin No Knead Bread is so simple to make: Just mix, wait, shape, and bake. Add pumpkin and a few seeds and you’ll be a star baker in no time!
Yellow leaves, chilly mornings, and cozy sweaters. Fall is arriving at Noshing with the Nolands and today we’re talking about freshly baked bread; pumpkin style! Pumpkin has always been synonymous with fall and we have so many great pumpkin recipes on the blog. Also, try our Homemade Whole Wheat Bread for another amazing loaf. Or our raved about Pumpkin Cookies.
Right now, it’s time to cozy up with a bowl of Spaghetti Meatball Soup and dip away with a buttery slice of still-warm Pumpkin No Knead Bread.


Hi everyone! My name is Bernice and I love gluten. My blog Dish ‘n’ the Kitchen, contains treasured family recipes, and many of my creations, and records my successes (and failures) as a baker.
The very first time I saw the New York Times famous No Knead Bread recipe, I knew I had to try it. From then on, I was hooked on bread baking, including my most recent sourdough baking experiments.

What is No Knead Bread?
The three most important characteristics of No Knead Bread are:
- very little commercial yeast when compared to regular yeast breads.
- a long rise or long fermentation period.
- a very wet sticky dough (high hydration) when compared with regular yeast breads.
In No Knead Bread, long gluten strands (which give the bread an airy texture) result from the long rise and higher hydration while traditional bread making methods rely on a lot of kneading to develop the gluten.

Despite the name, No Knead Bread is not an entirely hands-off bread baking method. Some hand mixing is required at the beginning to ensure all ingredients are properly mixed.
In addition, some stretching and folding (see photos above) helps to shape the bread before the final rise.

How Much Time Does It Take to Make No Knead Bread?
Even though it looks like this recipe takes forever, most of that time is entirely hands-off. The bread is practically making itself!
The great thing is that you can adjust the timing of this recipe to suit your own schedule. For example: mix up the ingredients in a large bowl before you leave for work in the morning, then come home and finish it later that evening.
I like to mix mine up at midnight, then do my final shaping at noon and bake around 3 pm. The timing really does depend on the temperature and humidity in your home.

How to Make This No Knead Bread Your Own
This easy recipe produces an artisan-quality loaf or boule with a golden brown crusty exterior and beautifully textured interior. It’s simply topped with pumpkin seeds, white and black sesame seeds.
Everyone has different tastes so feel free to experiment with other toppings such as nuts or cheese. Other ways to add your own flavor to this bread include adding herbs and spices, cheese, or olives during the mixing step.

How to Store No Knead Bread
Congratulations! You have now made your very own gorgeous boule of Pumpkin No Knead Bread. If you don’t immediately inhale all of the bread and want to store it, here’s how: To maintain that beautiful crisp crust, store it in a closed paper bag or linen bread bag.
Otherwise, store the loaf in an airtight plastic bag. Remember there are no preservatives in this bread so it’s best to consume it within a few days of baking.

Pin it HERE!!

Pin it HERE!!

Recipe adapted from this recipe by Chef John
Pumpkin No Knead Bread
Video
Ingredients
- 2/3 cup pumpkin pureé
- 1/4 tsp active yeast
- 1 cup warm water
- 1 tbsp honey
- 1 1/2 tsp salt
- 3 cups flour
- assorted seeds for this loaf, plain shelled pumpkin seeds, white and black sesame seeds but use what you like
Instructions
PUMPKIN NO KNEAD BREAD
- Place pumpkin purée, water, salt, yeast, and honey in a large mixing bowl. Mix together well.
- Add I cup of flour and thoroughly combine, repeat with 2 remaining cups of flour.
- Reach into the bowl and mix well with your hands. Knead dough until it is smooth and elastic.
- Tidy dough into a ball and cover the bowl with plastic wrap. Let rise 12 hours (up to 18 hours) until the dough has more than doubled and bubbles can be seen on the dough surface.
- Carefully remove dough from the bowl and place onto a clean work surface.
- Grab the side of the dough farthest away from you, stretch up (about 3 times the height of the dough) then fold over the dough. Repeat on the right side of the dough, the side closest to you, and finally the left side.
- Flip over the dough ball so that the smooth side is on top. Cup your hands around the ball and slide it slightly forward on the countertop. Rotate, and repeat until the dough is a neat ball.
- Carefully place the dough ball (smooth top facing downward) in a well-floured *banneton. Alternatively, line a medium bowl with a well-floured tea towel and place the dough ball in there.
- Cover and let rise until doubled, approximately 1-2 hours.
BAKING YOUR BREAD
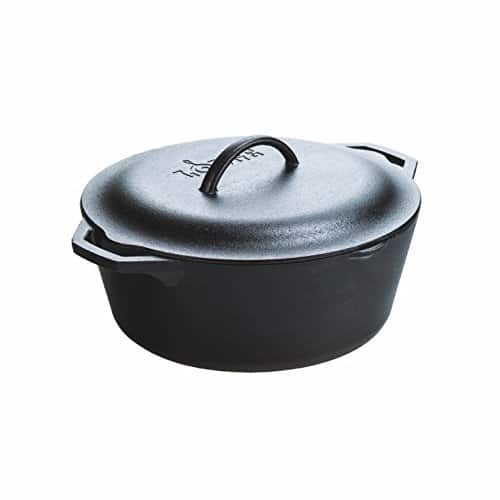
- Place Dutch oven in your oven and pre-heat it to 425 F.
- Cut a piece of parchment paper the size of the bottom of your Dutch oven. Place it over the basket (or bowl).
- To remove bread from basket/bowl, place a cutting board over the parchment paper, grab the basket/bowl with your thumbs and flip the whole thing over using a quick motion.
- Moisten hands with water and lightly rub over the surface of the boule. Scatter the seeds over the bread surface. You may need to press them in slightly.
- Score the bread with a sharp knife or bread **lame.
- Remove hot Dutch oven from your oven and carefully lower the boule into the pot (by holding onto the parchment paper).
- Cover and bake for 20 minutes. Remove the lid and bake for another 20-25 minutes. Baking time may vary from oven to oven.
- Remove bread from Dutch oven and place on rack to cool.


Comments & Reviews
Coby says
This bread came out just beautifully! Easy to make, soft and tender, and wonderful toasted and spread with pumpkin butter!
Tara Noland says
I am so glad you enjoyed it and with pumpkin butter, BIG YUM!!
Hannah Hardie says
Can this dough be made in a bread maker then baked in oven?
Tara Noland says
I have not tried that so I am not sure.
PATSY says
sounds great, but isn’t 1/4 cup yeast a bit much?
Tara Noland says
The recipe says 1/4 tsp. of yeast.