Sweet ‘n’ Spicy Canned Corn Relish brings a perfect pop of sweet heat to your backyard barbecue. Serve this colorful relish as a dip with chips, with shrimp, on tacos and nachos, burgers, hot dogs, or on your favorite grilled meat.
Not to sound corny, but if you love this sweet vegetable we have corn recipes you’re going to love too! Check out this easy Cotija Corn Salad, similar in flavor to Mexican street corn, or Elotes. Making chili? Then, you’ve got to try our Best Cast Iron Southern Cornbread. It’s moist, holds together beautifully, and it holds all the butter you can possibly slather!
Sweet ‘n’ Spicy Canned Corn Relish
The sweetness of fresh summer corn shines in this versatile canned relish. Do you like a little heat with your sweet or maybe a bit more firepower? Chopped jalapenos bring the heat and mingle with the sweet corn to get the party started. Once you’ve made a batch, you’ll be surprised at how much flavor is packed into every jar.

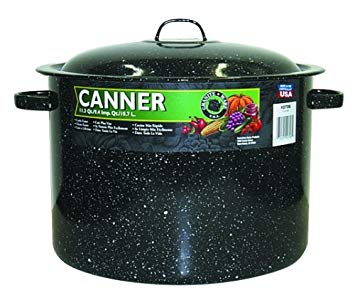
Helpful Items For This Recipe
This post contains affiliate links. As an Amazon Associate, I earn a small portion from qualifying purchases at no extra charge for you.
If you’ve never made a homemade relish before, this homemade sweet corn relish is for you. Most relish recipes require a fair amount of chopping and are very time-consuming. However, this vibrant relish contains mostly corn which automatically cuts the prep time by two thirds!
Prepping the ingredients is a breeze, but canning the relish is even easier. I promise.

Hello everyone, it’s Bernice from Dishnthekitchen.com and I’m sharing this recipe today from my busy canning kitchen! Summer produce is at its prime and I love sharing the best ways to preserve it with my readers.
Every year I preserve enough tomato sauce, or Passata, to last us through the winter. It contains so much Roma tomato flavor we can enjoy it over spaghetti on its own. What a great 5-minute meal!
Another family canning favorite (and top recipe on the blog) are these Pickled Carrots with Dill and Garlic. It’s crazy to think that I’ve been making these for over 20 years!

Choosing the Freshest Ingredients
Choosing the freshest ingredients for this relish is the best way to ensure your finished product is the best it can be. Select fresh corn with bright green ears and plump yellow kernels. Peel the ears down slightly and break the skin of a kernel with your fingernail. If juice doesn’t come squirting out, don’t use this corn (of course you should buy the cob your fingernail has been in!).
While choosing the turmeric and peppers (sweet red and jalapeno) look for smooth unblemished skin. They should be firm and have no soft spots or wrinkles.
Finally, choose firm garlic cloves with no blemishes or green sprouts.

How to Cut Corn Kernels from the Cob
There are many ways to cut corn kernels off of a fresh cob of corn. Begin by shucking off the husks and hair (the sticky annoying filaments at the top end of the ear of corn). Next, place a bundt cake pan on a table or in the sink. It needs to be low enough so you are comfortable.
Rest the pointy tip of the cob into the center hole of the bundt pan. Place the knife alongside the stem and cut in a downward motion along the side of the corn. The kernels should fall into the bowl but don’t be too alarmed if some escape! Do you have a helpful hint for cutting corn kernels off the cob?

Preparing the Vegetables
Now that the corn is ready and waiting, the next step in making this relish is cutting the peppers, onions, garlic, and turmeric. This is a great chance to practice your knife skills.
Begin by coring and seeding the red bell peppers and the jalapenos (wear gloves to prevent burning). Next, slice them into long, even strips. Note that the width of the strips determines the size of the final diced pepper. Finally, slice the strips crosswise to get square dices of pepper.
For the sweet red peppers, try to keep the size around 1/4 inch while the jalapenos should be half of that. Onions can be similar in size to the red peppers while garlic and turmeric should be finely minced. If you are using fresh garlic scapes, slice them into small rounds the same size as the diced red peppers.

How to Make Corn Relish
Once all the vegetables have been prepped, it’s easy sailing to the end of the recipe. The next step is adding the brine to the vegetables. Since this is a sweet relish, I’ve included a fair amount of sugar to make a sweet brine. Feel free to reduce the amount of sugar up to a half if you prefer a less sweet brine.
Making the brine is as simple as measuring and adding the ingredients to the pot of vegetables. Heat over medium-high to allow the relish to come to a boil stirring and reduce heat to medium-low to get a gentle simmer as you ready the canning equipment.

Get the High Altitude Water Bath Canning Chart Below


How to Can Corn Relish
- Fill the hot water bath canner 2/3 full with hot water. Cover, and bring to a rolling boil.
- Meanwhile, place jars upside down in a tray of water and leaving them in a 225 F oven for at least 10 minutes.
- Place lids, rings, funnel and measuring cup in a large saucepan of water. Heat and simmer. You can add any other equipment that needs sterilizing here.
- Add the corn, other chopped ingredients, and brine ingredients to a large pot or Dutch Oven. Heat and bring to a boil and let simmer while you get your canning ready.
- Take two hot jars out of the oven, fill them, and top up with a bit of hot vinegar brine. Leave about 1 cm of headspace.
- Tap the jars on the countertop to remove any air bubbles and add more vinegar if needed. Quickly top with a lid and fasten the ring just slightly, not too tightly.
- Place each filled jar in the rack of the canner, then lower it into the boiling water.
- You may need to remove water to prevent overflowing as the water boils or you may need to add boiling water to ensure the jars are covered with at least an inch of water at all times. It’s a good idea to keep a kettle of boiling water on while hot water canning.
- Process for 15 minutes or more, depending on your elevation. Here in Calgary, Alberta, I processed the half-pints (250 ml) jars for 25 minutes at a rolling boil.
- Remove from boiling water and allow them to cool on a towel-lined counter. Do not disturb for 12 hours.

How to Store the Canned Relish
Once the jars have cooled, inspect each lid to ensure it is depressed and sealed well. If one or two jars haven’t sealed, store them in the fridge and use within a month. Store the relish in a cool dark spot, like a basement or cellar. The canned corn relish will last for a year or slightly more when stored properly.
As always with any home canning, if the jar becomes unsealed or if the contents change color, do not consume. Additionally, if there is any fermentation, effervescence, strange odor, or mold present do not consume. Safety first…when in doubt, throw it out!

So Many Ways to Enjoy Canned Corn Relish
You have 9 beautiful jars of sweet ‘n’ spicy corn relish…now what? This relish is so tasty, it’s just great to eat as a side condiment or as a dip but it’s also fun to get creative with this relish! There are so many ways to use this relish.
- As a topping for nachos or on pizza
- In a pulled pork sandwich
- In a taco
- Baked into a frittata or Dutch oven pancake
- Mixed with queso for a delicious dip
- Placed on top of grilled meats
- Mixed in with shrimp, ceviche style!
- On burgers and hot dogs
- Baked into a casserole
- Give it away so others can enjoy it!
Pin it HERE!

Pin it HERE!


Sweet ‘n’ Spicy Canned Corn Relish
Ingredients
- 6 cups corn approx. 7 cobs or use frozen
- 2 cups sweet red pepper; finely diced 2 peppers
- 2 cups onions; very finely diced approx. 2 medium onions
- 1/2 – 1/3 cup jalpenos; very finely diced 3 jalapenos
- 1/2 cup garlic scapes; sliced thin or 5 cloves garlic; minced
- 2 tbsp fresh turmeric; minced
- 2 cups apple cider vinegar
- 1 cup sugar
- 2 tbsp pickling salt
Instructions
- Getting Canning Equipment Ready
- Fill a large canner with hot water and bring to a boil.
- Wash, inspect, and sterilize jars by placing them upside down in a tray of water and leaving them in a 225 F oven for at least 10 minutes.
- Wash, inspect, and place jar lids and rings in a large saucepan and cover with water. Add a jar funnel and any other equipment that needs sterilizing. Heat to a simmer then keep warm.
- Prepping the Corn Relish
- Meanwhile, add all the chopped ingredients and brine ingredients to a large pot or Dutch Oven. Heat and allow to come to a boil.
- Filling Jars and Processing
- Once you are ready to jar the relish, take two hot jars out of the oven, fill them and top up with a bit of hot vinegar brine. Leave about 1 cm of head space.
- Tap the jars on the counter top to remove any air bubbles and add more vinegar if needed. Quickly top with a lid and fasten the ring just slightly, not too tightly.
- Place each filled jar in the rack of the canner, then lower it into the boiling water.
- You may need to remove water to prevent overflowing as the water boils or you may need to add boiling water to ensure the jars are covered with at least an inch of water at all times. It’s a good idea to keep a kettle of boiling water on while hot water canning.
- Process for 15 minutes or more, depending on your elevation. Here in Calgary, Alberta I processed these 250 ml jars for 25 minutes at a rolling boil.
- Remove from boiling water and allow to cool. Do not disturb for 12 hours.


Comments & Reviews
Roy says
I would half the sugar; the sweet corn in Ontario is very sweet, and more than sweet enough. I used my homegrown jalapenos, and for whatever reason, they are very spicy. That I like. I may try with Scotch Bonnets or maybe a ghost pepper. Not sure how the Capsaicin will react with the other ingredients. I will advise. Thank you for the tips on canning. This yield is 5 sixteen ounce canning jars.
Tara Noland says
Yes, I grew up in Ontario and the corn there is very sweet. I am glad you are enjoying the recipe.
Joni says
I don’t think it is safe to water bath any corn!
Tara Noland says
That is true if it is just straight corn but a salsa or relish is acidic with the added vinegar.
Matthew says
So I just want clarity about cooking the brine. So we just did smaller amount but 1 cup of splice cider vinegar was not enough to cook it in. Also once it cooks do you the brine from what we cooked it in or use a pickling brine. One area we did not think was very clear. Maybe we are missing something
Tara Noland says
You don’t need to make other brine just the brine it was cooked it and top up with that liquid. Hopefully this clarifies it.
Amy says
I’m curious, when you serve this corn relish, do you strain it or are you supposed to also consume the brine? If you served with tortilla chips, wouldn’t you want to drain the liquid before placing in a serving bowl?
Tara Noland says
You could do either way but the juice is very flavorful too just like salsa is.
Donna says
Hello . May I ask if you can use kosher salt instead of pickling salt ? I use to make my Grandmother’s recipe but I wanted to put some jalapeño‘a in some this time . Thank you and have a good day!
Tara Noland says
Yes, you can use Kosher salt but you can’t use table salt for canning.
Ginger says
Could I make this without onions
Tara Noland says
Sure you can, you can make up the difference with peppers if you like.
dina says
I just made this relish, it is delicious!
Tara Noland says
So glad you liked it and thanks for coming back to tell us!!
laura gall says
I love corn salsa, but is it safe to can, does it have a high enough acid rate? I know even spaghetti sauce is not high
enough acidic to can. Thanks for your help. Laura
Tara Noland says
Sorry for the late reply, this message slipped through the normal channels. The recipe has enough acid with 2 cups of apple cider vinegar. You wouldn’t have any vinegar in spaghetti sauce normally.
Lisa Stanley says
I can’t find fresh tumeric can I use powdered? If so, how much?
Tara Noland says
We have always used fresh but from the internet, this is suggested. For 2 tablespoons chopped root, substitute 1/4 to 1/2 teaspoon ground turmeric instead.
Lyanna Soria says
That corn relish looks quite tasty and I love to try this someday. I don’t think I have tried making a dish like this before.
Toni says
This is so awesome! Can’t wait to give this a try!
Catalina says
My whole family loves corn so much. It’s a great idea to make a corn relish. I am sure they will love it!
Mama to 6 Blessings says
This sounds delish! What a great idea to have it on tacos! Yum!
Heather says
We’ve been buying a lot of corn lately. I’m always looking for new recipes. This is going on my list!