Classic, traditional Easy Homemade Blueberry Pie with a homemade flaky pie crust. The crust is made with a stand mixer to keep the recipe easy. You can also do it by hand with a pastry cutter—fewer and wide strips for an easy and quick lattice: great for lattice beginners.
This Blueberry pie is easy to make, and by the end, you’ll have the best homemade blueberry pie to relish. This recipe is perfect for newbies to someone who is looking for a comparatively quick treat. The inside is perfect and non-runny with the flaky and gorgeous crust.
If you are looking for more fun pie recipes, try our popular Peach Pie Almond Cream, delicious Lemon Meringue Pie, or irresistible Rhubarb Impossible Pie. You can always come back to the sought-after Hand Pies, Classic Apple Pie, or Cherry Pie too.

Helpful Items For This Recipe
This post contains affiliate links. As an Amazon Associate, I earn a small portion from qualifying purchases at no extra charge to you.
What Goes Into Blueberry Pie?

Here is the list of the ingredients to make the best homemade blueberry pie recipe with full instructions for the best pie crust recipe too! This recipe makes a 9 or 10-inch pie.
INGREDIENTS
PIE CRUST
- Cold butter
- All-purpose flour + extra
- Caster sugar (or granulated sugar)
- Salt
- Ice water
BLUEBERRY FILLING
- Caster or granulated sugar
- Cornstarch
- Ground cinnamon
- Fresh or frozen blueberries
- Lemon juice
FINISHING (EGG WASH)
- Egg
- Cold water
- Light brown sugar to sprinkle (or demerara sugar or granulated sugar)
How to Make Blueberry Pie

Don’t let the number of steps overwhelm you. This is the best homemade blueberry pie that is actually an easy-to-follow recipe. Let’s begin!
INSTRUCTIONS
Pastry
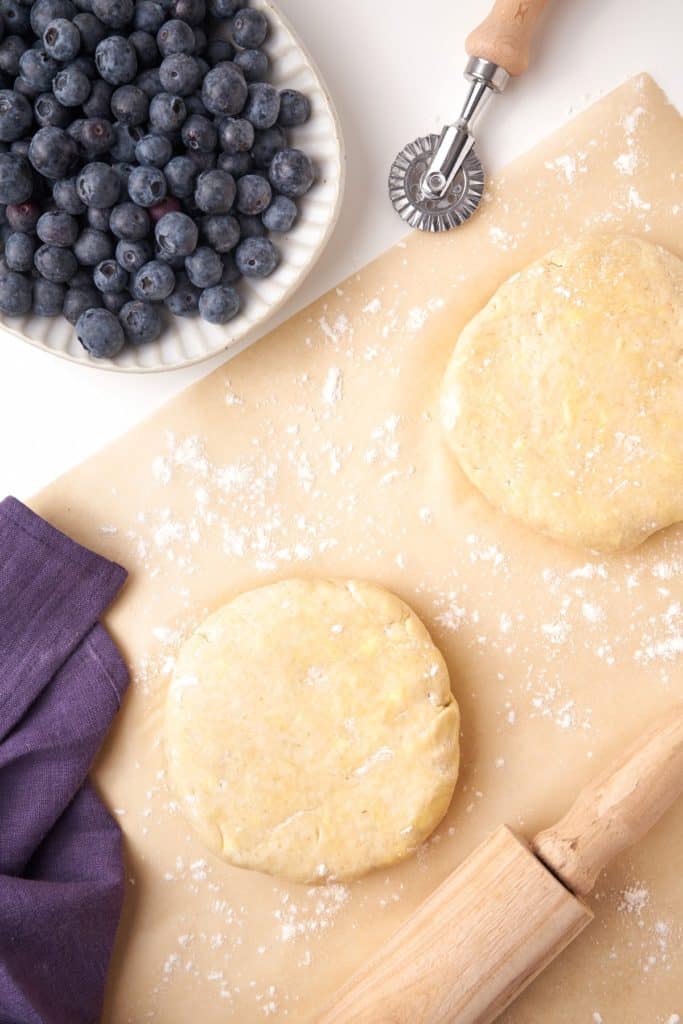
1) Start off by dicing the butter in a small size. Set aside.
2) Combine flour, sugar, and salt in a stand mixer fitted with the paddle attachment. It requires only a few seconds. Next, add the diced cubes of butter and mix at low speed until the mixture is kind of crumbly. It will appear as coarse crumbs. While the mixer is running, gradually add some water to it. Now bring the mixture together into a dough. Do not overmix. Divide the dough into 2 discs & cover individually with plastic wrap.
Refrigerate for 1 hour.
3) Roll out one dough disc for the bottom crust on a floured surface. Note: It should be about 2 inches (about 5cm) larger than the dish.
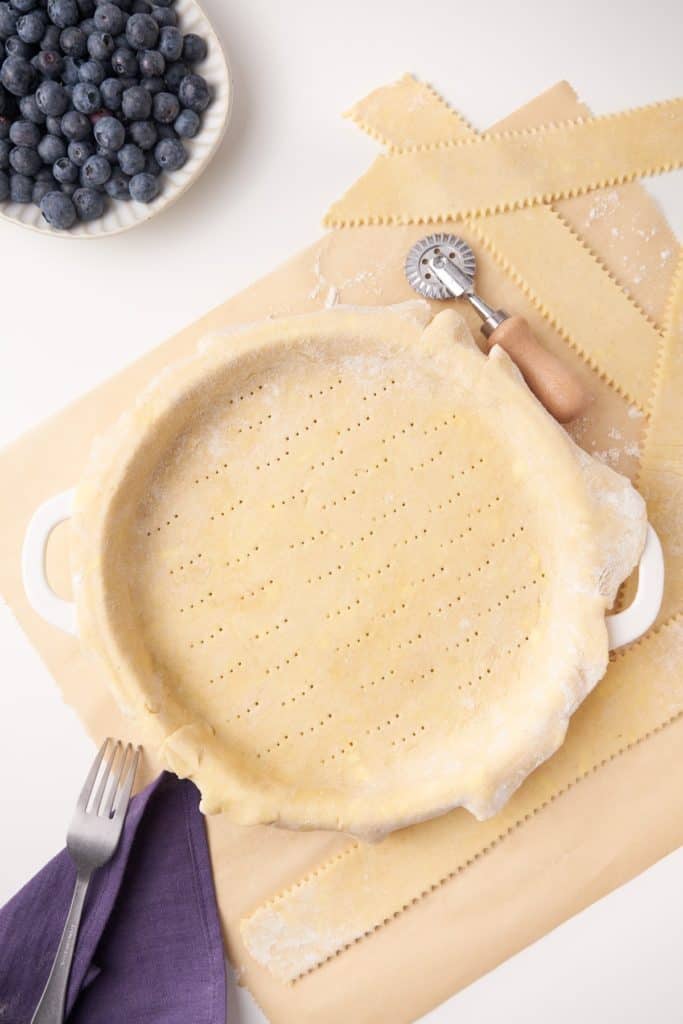
4) Line a pie dish with baking parchment. Do not grease the pan, as it will change the texture of the crust. Transfer the rolled-out dough carefully to the bottom of the pie tin. Press it gently.
Using a fork, prick all over the dough. (It’s usually recommended when pre-baking a pie crust. However, that is not the case for this recipe. But I noticed that it helps to keep the bottom of the pie flat.) Now refrigerate the pie dough while preparing the filling.
Filling

5) Filling: Add together sugar, cornstarch, and cinnamon in a large bowl and stir well. Pop in the blueberries, followed by the lemon juice. Toss to combine, be gentle. Also, be careful and don’t mash the blueberries. Fill the prepared pie crust with the blueberry filling. Refrigerate.
Lattice Crust

6) Lattice crust for the top crust: Roll out the 2nd dough disc. Use a floured surface to roll and fit over the top of the pie (use parchment baking paper, as it is easier to cut the strips this way.)
7) Use a pastry wheel or a pizza cutter to cut into 1.5 inches strips (4cm). 6 strips are ideal. (Feel free to cut into narrower strips if you prefer a tight lattice). Use a ruler to guide you. It will help to cut your strips straight.
8) Place 3 strips over the pie, parallel and evenly spaced from one another. (Add the long strip in the center and shorter strips toward the edges). Fold back the 1st and 3rd strip halfway (or the alternative strips if you cut narrower stripes). Place a long strip in the center perpendicularly. Unfold the dough strips over this new strip. Fold back the 2nd strip, which is under the new strip. Lay another strip of dough perpendicularly. Unfold the 2nd strip. Repeat with the last strip: Fold back the 2nd strip (opposite side from previously done), lay another strip of dough perpendicularly, unfold the 2nd strip: Lattice done. (If you cut narrow strips, repeat, alternating strips until the lattice is complete.)
9) Next, remove excess dough from the lattice strips. Pinch the edges of the strips to seal the pie. Fold the edges of the dough underneath itself to encase the ends of the strips. It will create a thick border to decorate and prevent the pie from unsealing during baking. Decorate the border: Keep it easy and simple with the classic fork crimp: Use a fork and press firmly the edges of the crust.
Baking

10) Refrigerate the pie for a minimum of 30 minutes (or overnight if you want to prepare it the day before).
11) Preheat the oven to 400°F (200°C)
12) Beat 1 egg with a tablespoon of cold water. Brush nicely over the lattice and edges. Sprinkle generously some light brown sugar (best results with demerara sugar. This sugar has large crystals that give a crunchy texture). The egg wash provides a nice brown color, a pretty shiny effect, and helps the sugar to adhere.
13) Put a baking sheet under your pie in case it overflows at all. Place the pie in the center of the oven and bake for 20 minutes. After 20 minutes, decrease the temperature to 350°F (180°C) and bake for 25-30 minutes. You will see the crust is now golden brown, and the filling is bubbling around the edges. If the crust begins to brown too much, use aluminum foil to cover and continue to bake until the filling is bubbling. Next time, you probably need to adjust the temperature of your oven.
14) Let it sit to cool completely before cutting and serving. Serve with ice cream, custard, or whipped cream.

Does Blueberry Pie Need to be Refrigerated?

Freshly made Blueberry pie needs to be cooled down firstly at room temperature. Generally, it takes 2 to 4 hours. Then you can refrigerate the pie for a few hours before serving, ideally, about 5 to 6 hours. If properly stored at room temperature, the blueberry pie can last well and be good for about 2 days. While refrigerating, cover with a plastic wrap loosely. You can easily refrigerate the blueberry pie for up to 5 days.
Can You Freeze Blueberry Pie?

Yes, you can freeze blueberry pie once it has cooled down at room temperature. Let it sit when freshly made for a couple of hours. Once cool, you can freeze it. Freezing the pie makes it easier to cut while serving. Otherwise, you can freeze the freshly baked blueberry pie, and it will last well and be good for about 6 months or even more if stored properly and safely at 0° F.
Should I Thaw Frozen Blueberries Before Baking A Pie?

Fresh blueberries should be the go-to option. But if unavailable, frozen blueberries do the work equally well. You can use frozen blueberries directly into your pie. Just make sure they are not too icy, and you will need to bake them longer also.
You can also thaw and drain the frozen blueberries before baking the pie. The frozen ice needs to melt away well. You can thaw them in the refrigerator overnight or use cold water to prevent them from being mushy. Add the blueberries into a bowl of cold water and let it sit at room temperature. They will be thawed in 5 minutes or so.
Why is my blueberry pie runny?

Runny pie? No worries! This can be due to various reasons, primarily due to the berries. Baking draws out water, resulting in this issue. Similarly, other factors can be that the blueberry pie has not cooled enough or baked long enough. Add in more cornstarch if you have the feeling that your pie is going to be runny ie) big juicy blueberries, icy blueberries, or thawed blueberries.
Pin it HERE!!

Pin it HERE!!


Blueberry Pie
Ingredients
Pie crust:
- 3/4 cup + 2 tablespoons of cold butter
- 2 1/2 cups of all-purpose flour + extra
- 1 tablespoon of caster sugar or granulated sugar
- 1 teaspoon of salt
- 1/2 cup of ice water
Blueberry filling
- 1/2 cup of caster / granulated sugar
- 1/4 cup of cornstarch
- 1 teaspoon of ground cinnamon
- 5 cups of fresh blueberries
- 1 tablespoon of lemon juice
Finishing (egg wash)
- 1 egg
- 1 tablespoon of cold water
- Light brown sugar to sprinkle or granulated sugar or demerara sugar
Instructions
- 1) Cut the butter in small dice. Set aside.
- 2) In the bowl of your stand mixer, fitted with the paddle attachment, combine the flour, sugar, and salt. It takes only a few seconds to combine. Turn off the mixer. Add the diced butter. Mix on low speed until the mixture is crumbly. It will look like coarse crumbs. While the mixer is running, gradually add the water to bring the mixture together into a dough. Do not overmix. Divide the dough into 2 discs and cover individually with plastic wrap.
- Refrigerate for 1 hour.
- 3) Roll out one of the dough discs on a floured surface. Note: It should be about 2 inches (5cm) larger than the dish.
- 4) Line a pie dish with baking parchment. Avoid greasing the pan. It will change the texture
of the crust. Transfer the rolled-out dough carefully to the bottom of the pie tin. Press it gently.
Using a fork, prick all over the dough. (It’s usually recommended when pre-baking a pie crust, which is not the case for this recipe. But I find it helps to keep the bottom of the pie flat.) Refrigerate the pie dough while preparing the filling. - 5) Filling: Stir together sugar, cornstarch, and cinnamon in a large bowl. Add the blueberries, then add the lemon juice. Gently toss to combine. Be careful not to mash the blueberries. Fill the prepared pie crust with the blueberry filling. Refrigerate.
- 6) Lattice crust Roll out the 2nd dough disc on a floured surface to fit over the top of the pie (on a parchment
baking paper, it will be easier to cut the strips.) - 7) With a pastry wheel or a pizza cutter, cut into 1.5 inches strips (4cm). You need 6 strips. (Feel free to cut into narrower strips if you prefer a tight lattice). Use a ruler to guide you. It will help to cut your strips straight.
- 8) Place 3 strips over the pie, parallel and equally spaced from one another. (Place the longer strip in the center and shorter strips toward the edges). Fold back the 1st and 3rd strip halfway (or every other strip if you cut narrower stripes). Place a long strip in the center perpendicular. Unfold the dough strips over this new strip. Fold back the 2nd strip, which is under the new strip. Lay another strip of dough perpendicular. Unfold the 2nd strip. Repeat with the last strip: Fold back the 2nd strip (opposite side from previously done), lay another strip of dough perpendicular, unfold the 2nd strip: Lattice done. (If you cut narrow strips, repeat, alternating strips until the lattice is complete.)
- 9) Trim the excess dough from the lattice strips. Pinch the edges of the strips to seal the pie. Fold the edges of the dough underneath itself to encase the ends of the strips. It will create a thick border to decorate and prevent the pie from unsealing during baking. Decorate the border: I keep it easy and simple with the classic fork crimp: Using a fork, press firmly the edges of the crust.
- 10) Refrigerate the pie for at l east 30 minutes (or overnight if you want to prepare it the day before).
- 11) Preheat the oven to 400°F (200°C)
- 12) Beat 1 egg with 1 tablespoon of cold water. Brush over the lattice and edges. Sprinkle generously with light brown sugar (best results with demerara sugar. This sugar has large crystals that give a crunchy texture). The egg wash gives a nice brown color, a shiny effect, and helps the sugar to adhere.
- 13) Place the pie in the center of the oven and bake for 20 minutes. After 20 minutes, turn down the temperature to 350°F (180°C) and bake for 25-30 minutes until the crust is golden brown and the filling is bubbling around the edges. If the crust begins to brown too much, cover with aluminum foil and continue to bake until the filling is bubbling. Next time, you probably need to adjust the temperature of your oven.
- 14) Leave to cool completely before cutting and serving. Serve with ice cream, whipped cream, or custard
Equipment


Notes
You can prepare the pie the day before and bake it the D-day. Wrap it and leave it in the
fridge overnight (do not brush with the egg wash the day before, do it just before baking).
Better with fresh blueberries. If you use frozen blueberries, do not thaw them. Add 1.5 extra
tablespoons of cornstarch. The filling maybe a little bit liquid, depending on the water from
the blueberries. It will take more time to bake and the filling to bubble. Keep an eye on the crust. It may
become golden brown before the filling is ready. Cover with aluminum foil and continue to
bake until it’s bubbling. Coldwater: Your water must be as cold as possible. I always have a bottle of water in my fridge. If you use ice cubes to cool your water, make sure to measure the water just before adding it to the dough. Otherwise, with the melted ice cubes, the measurement will be wrong.


Comments & Reviews
Addicted to Recipes says
Tara and Ken this looks fantastics! I’m featuring your recipe this week over at Addicted to Recipes! http://iamaddictedtorecipes.blogspot.ca/2012/08/scrumptious-sunday-25-features.html
Noshing with the Nolands says
Thank you so much, we are thrilled.
Carolyn says
Tara, everything looks amazing, especially the pie.
Noshing with the Nolands says
Thanks so much Carolyn!!
Winnie says
It’s a gorgeous pie!
Very beautiful and seems to be super delicious!
Noshing with the Nolands says
Thank you Winnie!!